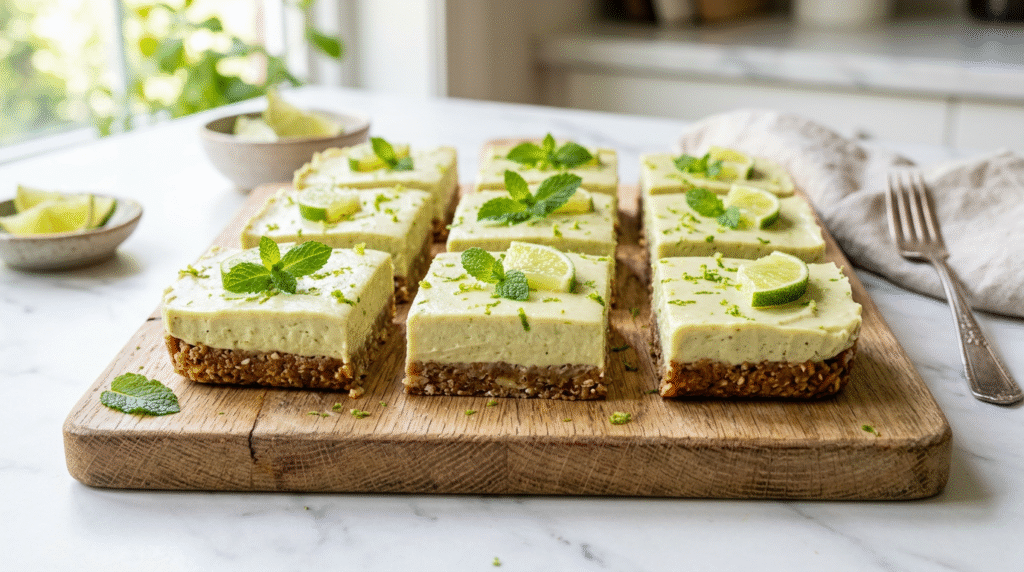
Craving a dessert that’s bright, refreshing, and utterly irresistible, but also happens to be entirely plant-based and requires no oven? Look no further than these incredible No-Bake Vegan Key Lime Pie Bars. Imagine a sunny slice of pure bliss: a vibrant, tangy key lime filling so creamy it melts in your mouth, perfectly balanced by a crisp, buttery-tasting crust made from wholesome ingredients. This recipe solves the dilemma of wanting a show-stopping dessert without the fuss of baking, making it perfect for warm weather gatherings, potlucks, or simply a delightful treat any day of the week.
These bars deliver all the iconic zesty flavor of traditional key lime pie, but in a convenient, easy-to-serve bar format. The magic lies in the simple combination of fresh key lime juice, creamy coconut milk, and a touch of sweetness, all set to perfection without a single minute in the oven. The crust provides a delightful textural contrast, offering a satisfying crunch that complements the smooth, luscious filling. Whether you’re a seasoned vegan baker or just looking for a delicious, dairy-free alternative, these bars are designed for success. They’re not just a dessert; they’re a refreshing experience that will leave everyone asking for the recipe. Get ready to fall in love with your new favorite no-bake treat!
Prep Time: 30 minutes | Chill Time: 4 hours | Total Time: 4 hours 30 minutes | Yield: 9-12 bars
Ingredients
For the Crust:
- 1 ½ cups (180g) rolled oats (use certified gluten-free if needed)
- ½ cup (60g) raw cashews
- ¼ cup (50g) packed light brown sugar
- ¼ teaspoon sea salt
- ¼ cup (60ml) melted refined coconut oil
For the Key Lime Filling:
- 1 ½ cups (360ml) full-fat canned coconut milk (refrigerated overnight, use only the thick cream)
- ¾ cup (180ml) fresh key lime juice (about 10-12 key limes)
- ½ cup (120ml) agave nectar or maple syrup
- ¼ cup (30g) cornstarch or arrowroot powder
- 1 teaspoon key lime zest (from about 2 key limes)
- Pinch of turmeric (for color, optional)
Step-by-Step Instructions
- Prepare Pan: Line an 8×8 inch (20×20 cm) square baking pan with parchment paper, leaving an overhang on two sides.
- Make Crust: In a food processor, combine oats, cashews, brown sugar, and salt. Pulse until fine crumbs. Add melted coconut oil; process until mixture comes together and sticks.
- Press Crust: Transfer mixture to the prepared pan. Press firmly and evenly into the bottom. Freeze for 15 minutes while preparing filling.
- Prepare Coconut Cream: Scoop 1 ½ cups of thick, solid coconut cream from a can of refrigerated full-fat coconut milk, leaving any clear liquid behind.
- Cook Filling: In a medium saucepan, whisk coconut cream, key lime juice, agave nectar (or maple syrup), cornstarch (or arrowroot powder), and key lime zest. Add a tiny pinch of turmeric for color, if desired.
- Thicken Filling: Cook over medium heat, whisking continuously, for 5-8 minutes until mixture thickens significantly to a pudding-like consistency.
- Assemble: Remove crust from freezer. Pour warm key lime filling evenly over the chilled crust. Gently tap pan to release air bubbles.
- Chill: Cover loosely with plastic wrap and refrigerate for at least 4 hours, or preferably overnight, until completely set and firm.
- Slice & Serve: Lift bars from pan using parchment overhang. Place on a cutting board. Cut into 9 or 12 squares with a sharp knife (wipe clean between cuts for neatness). Serve chilled.
Pro Tips for Success
- Chill Coconut Milk: Refrigerate full-fat coconut milk overnight. This ensures the thick cream separates, vital for a super creamy, well-set filling.
- Thicken Filling Properly: Whisk continuously over medium heat until the filling is thick like pudding. This step is crucial for the bars to set firmly.
- Firm Crust: Press the crust mixture very firmly into the pan using a flat bottomed glass or measuring cup. A compact crust prevents crumbling when sliced.
- Clean Slices: For neat edges, use a sharp knife. Run it under hot water and wipe dry before each cut to prevent dragging through the filling.
Variations & Substitutions
- Gluten-Free: This recipe is naturally gluten-free if you use certified gluten-free rolled oats for the crust.
- Citrus Swap: Regular lime juice works well if key limes are unavailable. Lemon juice can also be used for a lemon bar twist.
- Nut-Free Crust: Replace cashews with sunflower or pumpkin seeds, or use a store-bought vegan graham cracker crust.
- Sweetener: Adjust agave nectar or maple syrup to taste for desired sweetness.
Serving Suggestions
These No-Bake Vegan Key Lime Pie Bars are a perfect refreshing dessert, especially for warmer months, picnics, or barbecues. Serve them chilled, perhaps with a dollop of vegan whipped cream or a sprinkle of extra key lime zest. They also make a wonderful addition to any dessert platter, offering a vibrant, tangy contrast.
Storage & Reheating
Store leftover bars in an airtight container in the refrigerator for up to 5 days. For longer storage, wrap individual bars tightly in plastic wrap and freeze for up to 1 month. Thaw in the refrigerator for a few hours before serving. Reheating is not recommended as these are a chilled dessert.
Frequently Asked Questions
Q: Can I make these bars ahead of time?
A: Yes, they are ideal for making ahead! Preparing them the day before allows the filling to set completely and flavors to meld beautifully.
Q: What if I can’t find key limes?
A: Regular Persian lime juice is a great substitute. The flavor will still be wonderfully zesty and delicious, just be sure to use fresh juice.
Q: Why is my filling not thickening?
A: Ensure you’re whisking continuously over medium heat until it reaches a thick, pudding-like consistency. If still thin, dissolve an additional teaspoon of cornstarch in cold water and whisk into the hot mixture, cooking for another minute.
Final Thoughts
These No-Bake Vegan Key Lime Pie Bars are a burst of sunshine in every bite. With their vibrant tang, creamy texture, and satisfying crust, they prove that plant-based treats can be both incredibly delicious and effortlessly elegant. Whip up a batch for your next gathering or simply to brighten your day. You’ll be amazed at how easy it is to create such a delightful and refreshing dessert without even turning on your oven!