Imagine a treat that delivers all the rich, comforting flavor of classic peanut butter fudge, but without the need for an oven, a candy thermometer, or any complicated steps. These No-Bake Vegan Peanut Butter Fudge Bites are precisely that dream come true. They offer a delightful solution for anyone craving a decadent dessert that’s both incredibly easy to make and aligns with a plant-based lifestyle. Forget long ingredient lists and endless baking; this recipe comes together in mere minutes, making it perfect for busy weeknights, last-minute gatherings, or simply when a sweet craving strikes.
Each bite is a symphony of textures and flavors. You’ll experience an initial yielding softness, followed by a melt-in-your-mouth creaminess that’s utterly satisfying. The dominant flavor is, of course, the beloved nutty richness of peanut butter, perfectly balanced with a touch of sweetness that isn’t cloying. There’s a subtle hint of vanilla that elevates the overall profile, making these bites taste truly gourmet despite their simplicity. They’re substantial enough to feel like a proper indulgence, yet light enough not to weigh you down. Whether you’re a seasoned vegan baker or just looking for a quick, healthier treat, these fudge bites are destined to become a staple in your kitchen. Get ready to fall in love with your new favorite no-bake dessert!
Recipe Info:
- Prep Time: 15 minutes
- Cook Time: 0 minutes
- Total Time: 15 minutes (plus chilling)
- Yield: 24 bites
Ingredients
- 1 cup (250g) creamy peanut butter (natural, unsweetened)
- 1/2 cup (120ml) maple syrup (or agave nectar)
- 1/4 cup (55g) coconut oil, melted
- 1 teaspoon vanilla extract
- 1/4 teaspoon sea salt
- Optional: 1/4 cup chopped roasted peanuts for topping
- Optional: 2 tablespoons vegan chocolate chips, melted, for drizzling
Step-by-Step Instructions
- Prepare Your Pan: Line an 8×8 inch (20×20 cm) square baking dish or a small loaf pan with parchment paper, leaving an overhang on the sides to easily lift the fudge later.
- Combine Wet Ingredients: In a medium mixing bowl, combine the creamy peanut butter, maple syrup, melted coconut oil, vanilla extract, and sea salt.
- Mix Until Smooth: Stir vigorously with a spatula or whisk until all ingredients are thoroughly combined and the mixture is completely smooth and uniform. There should be no streaks of oil or syrup. The mixture will be thick but pourable.
- Transfer to Pan: Pour the peanut butter mixture into the prepared pan. Use the back of a spoon or a spatula to spread it evenly into a flat layer.
- Chill to Set: Place the pan in the refrigerator for at least 2-3 hours, or in the freezer for 45-60 minutes, until the fudge is firm to the touch and fully set.
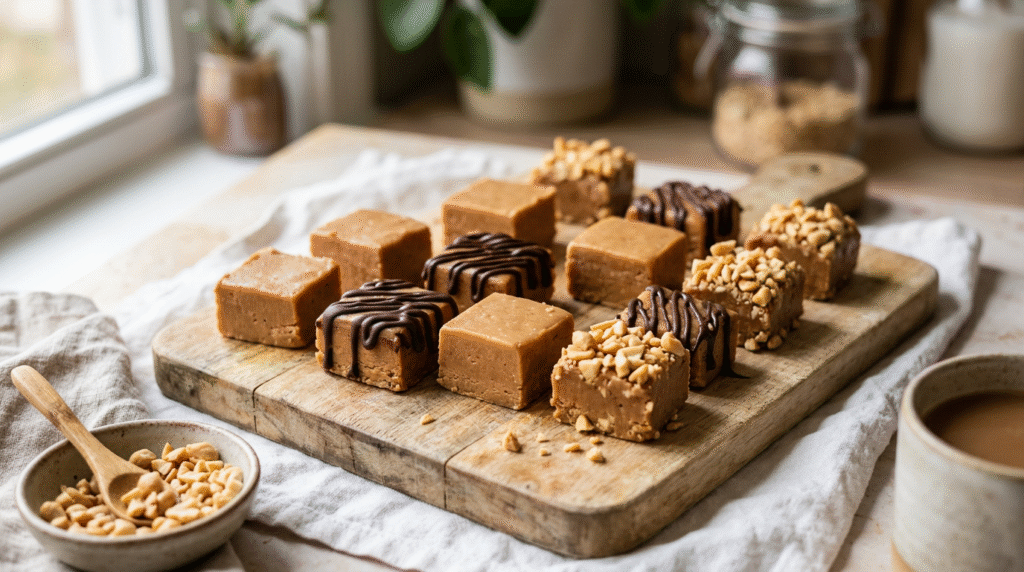
- Cut into Bites: Once firm, use the parchment paper overhang to lift the fudge slab out of the pan. Place it on a cutting board. Use a sharp knife to cut the fudge into small, bite-sized squares, approximately 1×1 inch (2.5×2.5 cm).
- Optional Toppings: If desired, sprinkle with chopped roasted peanuts or drizzle with melted vegan chocolate.
- Serve and Store: Serve immediately or store in an airtight container in the refrigerator.
Pro Tips for Success
- Use Natural Peanut Butter: Opt for natural, unsweetened creamy peanut butter where the only ingredients are peanuts and salt. This ensures the best texture and flavor, as conventional peanut butter often contains added sugars and oils that can alter the fudge’s consistency.
- Melt Coconut Oil Gently: Ensure your coconut oil is fully melted but not hot. If it’s too warm, it can cause the mixture to separate or become oily. A gentle melt in the microwave or a double boiler works best.
- Mix Thoroughly: Take your time to mix the ingredients until completely smooth and emulsified. Any separation will result in a grainy or oily texture in the final fudge. Scrape down the sides of the bowl to ensure everything is incorporated.
- Chill Until Firm: Don’t rush the chilling process. The fudge needs to be thoroughly firm before cutting to achieve clean, defined squares. If it’s still too soft, it will be messy and difficult to handle.
Variations & Substitutions
- Nut Butter Swaps: While peanut butter is classic, you can experiment with other creamy nut butters like almond butter or cashew butter for a different flavor profile. Ensure they are natural and unsweetened.
- Sweetener Alternatives: Maple syrup provides a lovely depth of flavor, but agave nectar can be used as a direct 1:1 substitute. For a slightly different taste, you could try brown rice syrup, though it might make the fudge a bit stickier.
- Flavor Boosts: Stir in a pinch of cinnamon or a dash of espresso powder with the wet ingredients for an added layer of flavor. A sprinkle of flaky sea salt on top before chilling also enhances the sweetness.
- Protein Boost: For a higher-protein option, you can mix in 1-2 tablespoons of unflavored or vanilla vegan protein powder. You might need to add a tiny bit more maple syrup or a splash of plant milk to maintain the desired consistency.
Serving Suggestions
These No-Bake Vegan Peanut Butter Fudge Bites are incredibly versatile. They make a fantastic after-dinner treat, a satisfying afternoon snack, or a delightful addition to a dessert platter for parties and potlucks. Pair them with a cup of hot coffee or tea for a cozy indulgence, or enjoy them chilled straight from the fridge on a warm day. They’re also excellent crumbled over vegan ice cream or yogurt for an extra layer of texture and flavor.
Storage & Reheating
Store these fudge bites in an airtight container in the refrigerator for up to 1 week. The coconut oil will keep them firm and prevent them from melting at room temperature. For longer storage, you can freeze the bites in a single layer on a parchment-lined tray until solid, then transfer them to a freezer-safe bag or container. They will keep well in the freezer for up to 2-3 months. Thaw them in the refrigerator for a few hours or enjoy them straight from the freezer for a firmer, chewier treat. Reheating is not recommended as they are best enjoyed chilled.
Frequently Asked Questions
- Q: Why is my fudge mixture oily?
- A: This can happen if your coconut oil was too hot when mixed, or if the ingredients weren’t thoroughly emulsified. Ensure all ingredients are at room temperature (except melted coconut oil, which should be just melted, not hot) and mix vigorously until completely smooth.
- Q: Can I make these without coconut oil?
- A: Coconut oil is crucial for the firm, fudge-like texture as it solidifies when chilled. Substituting it would significantly change the consistency. If you need to avoid coconut oil, you might look for a different type of no-bake fudge recipe that uses other binding agents.
- Q: Are these fudge bites suitable for meal prep?
- A: Absolutely! These are perfect for meal prep. Make a batch at the beginning of the week and store them in the refrigerator for easy grab-and-go snacks or desserts throughout the week. They hold up beautifully.
Final Thoughts
These No-Bake Vegan Peanut Butter Fudge Bites are more than just a simple dessert; they’re a testament to how utterly delicious and satisfying plant-based treats can be. With their rich, creamy texture and irresistible peanut butter flavor, they prove that you don’t need an oven or complicated techniques to create something truly special. Whip up a batch today and discover the pure joy of a perfectly sweet, effortlessly made indulgence that everyone will adore.